# Vue3
github: https://github.com/vuejs/vue-next
中文文档: https://www.vue3js.cn/docs/zh/
# 为什么用Vue3
# 响应式Proxy
其实在 Vue3.x 还没有发布 bate 的时候, 很火的一个话题就是Vue3.x 将使用 Proxy 取代 Vue2.x 版本的 Object.defineProperty。 没有无缘无故的爱,也没有无缘无故的恨。为何要将Object.defineProperty换掉呢,咋们可以简单聊一下。 我刚上手 Vue2.x 的时候就经常遇到一个问题,数据更新了啊,为何页面不更新呢?什么时候用$set更新,什么时候用$forceUpdate强制更新,你是否也一度陷入困境。后来的学习过程中开始接触源码,才知道一切的根源都是 Object.defineProperty。 对这块想要深入了解的小伙伴可以看这篇文章 为什么 Vue3.0 不再使用 defineProperty 实现数据监听?要详细解释又是一篇文章,这里就简单对比一下Object.defineProperty 与 Proxy
Object.defineProperty只能劫持对象的属性, 而 Proxy 是直接代理对象
由于Object.defineProperty只能劫持对象属性,需要遍历对象的每一个属性,如果属性值也是对象,就需要递归进行深度遍历。但是 Proxy 直接代理对象, 不需要遍历操作
Object.defineProperty对新增属性需要手动进行Observe
因为Object.defineProperty劫持的是对象的属性,所以新增属性时,需要重新遍历对象, 对其新增属性再次使用Object.defineProperty进行劫持。也就是 Vue2.x 中给数组和对象新增属性时,需要使用$set才能保证新增的属性也是响应式的, $set内部也是通过调用Object.defineProperty去处理的。
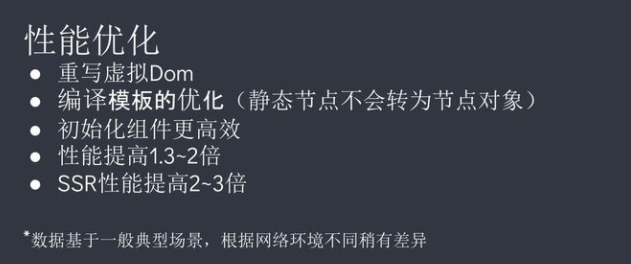
# 性能优化
# 要点1:编译模板的优化
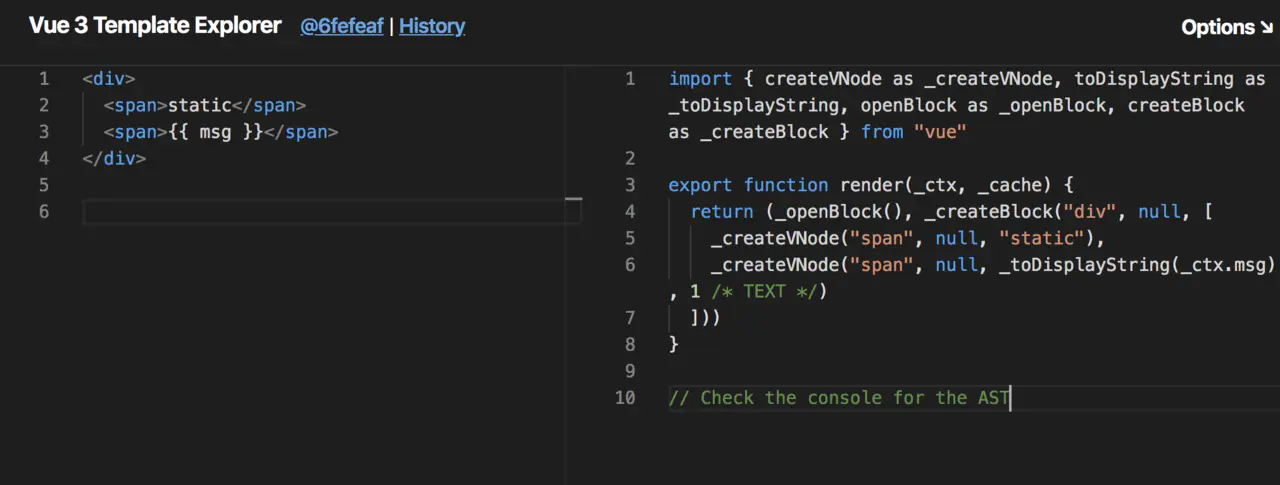
假设要编译以下代码
<div>
  <span/>
  <span>{{ msg }}</span>
</div>
将会被编译成以下模样:
import { createVNode as _createVNode, toDisplayString as _toDisplayString, openBlock as _openBlock, createBlock as _createBlock } from "vue"

export function render(_ctx, _cache) {
  return (_openBlock(), _createBlock("div", null, [
    _createVNode("span", null, "static"),
    _createVNode("span", null, _toDisplayString(_ctx.msg), 1 /* TEXT */)
  ]))
}

// Check the console for the AST
注意看第二个_createVNode结尾的“1”:
Vue在运行时会生成number(大于0)值的PatchFlag,用作标记。
仅带有PatchFlag标记的节点会被真正追踪,且无论层级嵌套多深,它的动态节点都直接与Block根节点绑定,无需再去遍历静态节点
刚刚我们提到 Vue3 突破 Vdom 的性能瓶颈的方式是,只关注它有变化的部分。而在更新时具体是怎么做的呢?
具体的做法就是 静态树的提升 和 静态属性的提升
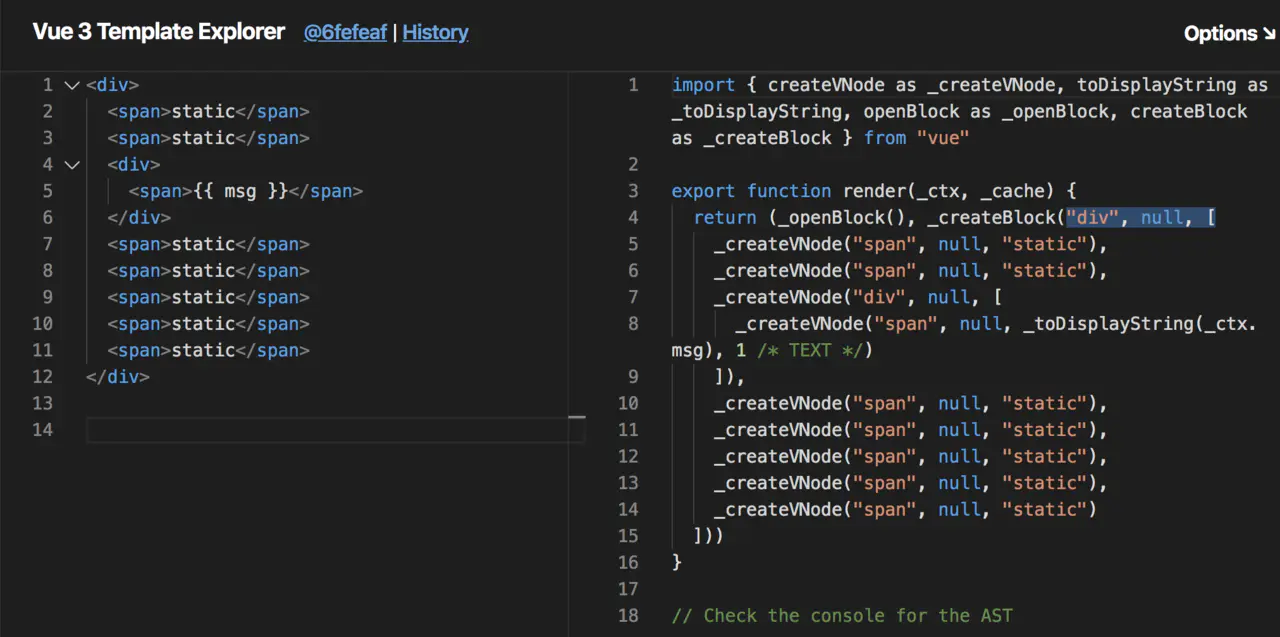
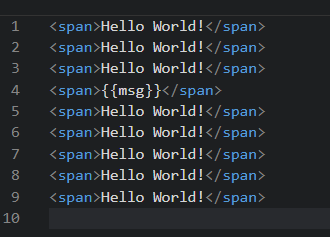
我们创建若干的 dom 元素:
静态提升之后:
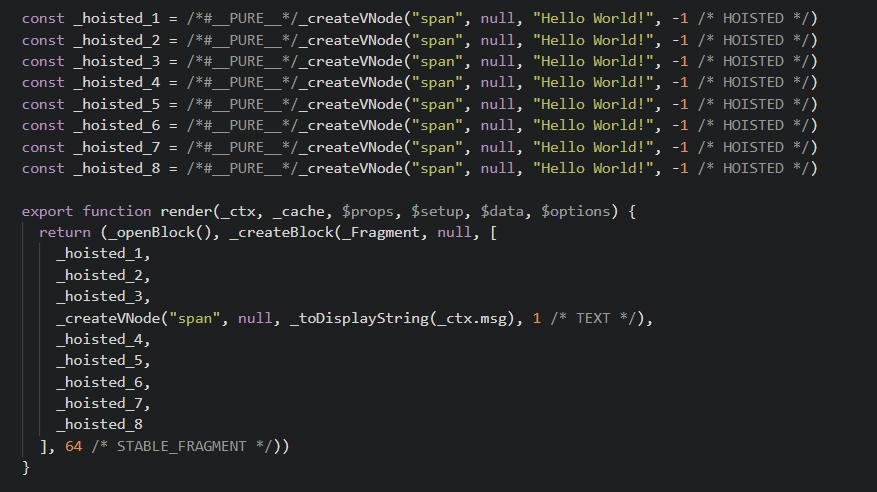
我们已经知道处理后的
Vdom都在_createBlock函数之中,而观察结果我们发现,所有的静态元素都被放在了_createBlock函数之外了,也就是说他们只会在页面初始的时候被渲染一次,而在更新的时候,静态元素是不予搭理的。这个优化就是 Vue3 的 静态提升
再看以下例子:
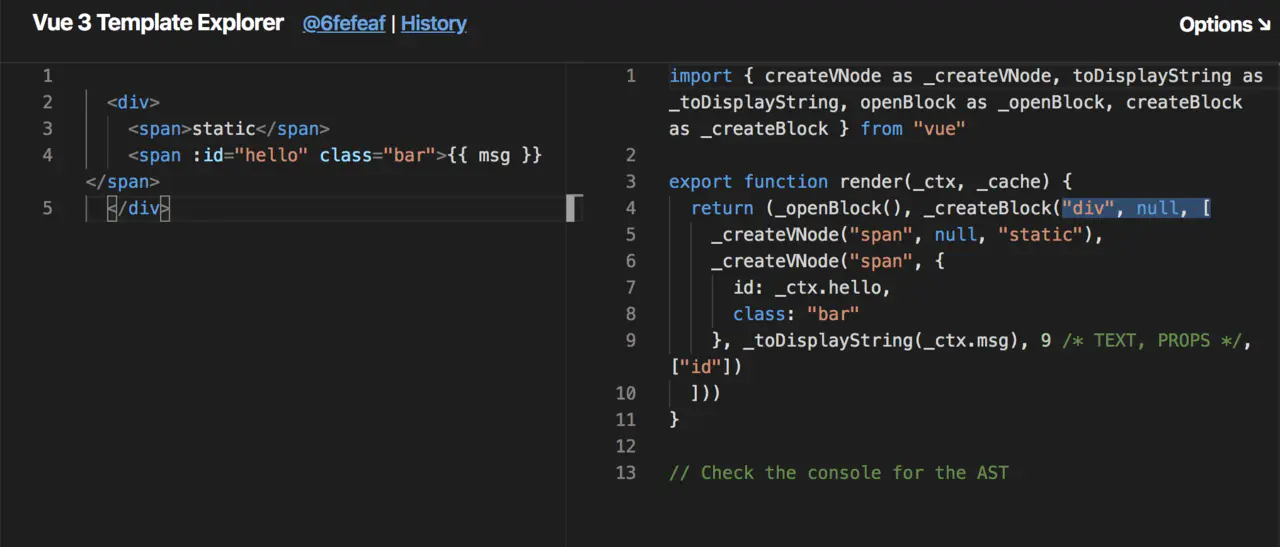
<div>
  <span>static</span>
  <span :id="hello" class="bar">{{ msg }}   </span>
</div>
会被编译成:
import { createVNode as _createVNode, toDisplayString as _toDisplayString, openBlock as _openBlock, createBlock as _createBlock } from "vue"

export function render(_ctx, _cache) {
  return (_openBlock(), _createBlock("div", null, [
    _createVNode("span", null, "static"),
    _createVNode("span", {
      id: _ctx.hello,
      class: "bar"
    }, _toDisplayString(_ctx.msg), 9 /* TEXT, PROPS */, ["id"])
  ]))
}

PatchFlag` 变成了`9 /* TEXT, PROPS */, ["id"]
它会告知我们不光有TEXT变化,还有PROPS变化(id)
这样既跳出了virtual dom性能的瓶颈,又保留了可以手写render的灵活性。 等于是:既有react的灵活性,又有基于模板的性能保证。
# 要点2: 事件监听缓存:cacheHandlers
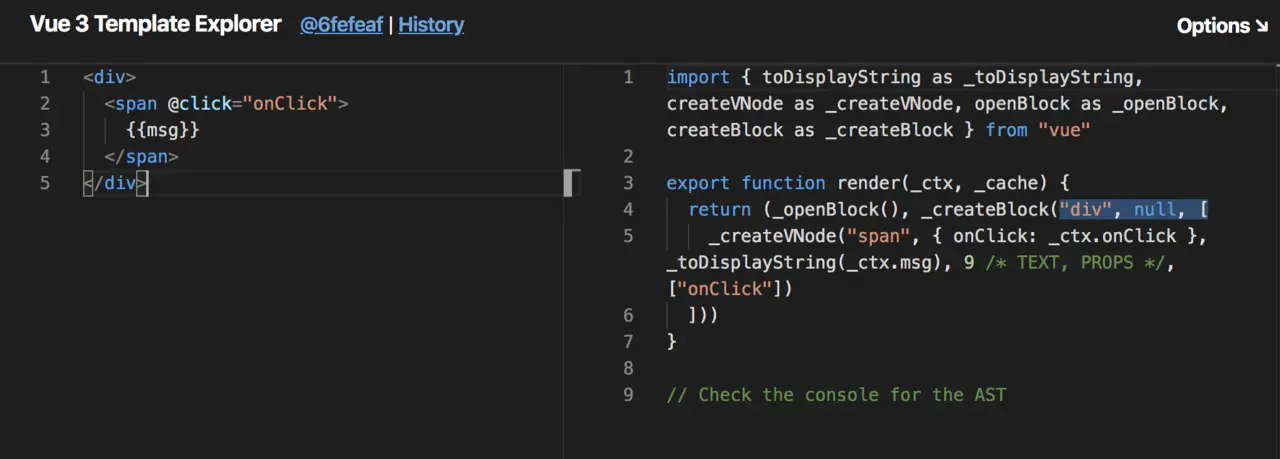
假设我们要绑定一个事件:
<div>
  <span @click="onClick">
    {{msg}}
  </span>
</div>
关闭cacheHandlers后:
import { toDisplayString as _toDisplayString, createVNode as _createVNode, openBlock as _openBlock, createBlock as _createBlock } from "vue"

export function render(_ctx, _cache) {
  return (_openBlock(), _createBlock("div", null, [
    _createVNode("span", { onClick: _ctx.onClick }, _toDisplayString(_ctx.msg), 9 /* TEXT, PROPS */, ["onClick"])
  ]))
}
onClick会被视为PROPS动态绑定,后续替换点击事件时需要进行更新。
开启cacheHandlers后:
import { toDisplayString as _toDisplayString, createVNode as _createVNode, openBlock as _openBlock, createBlock as _createBlock } from "vue"

export function render(_ctx, _cache) {
  return (_openBlock(), _createBlock("div", null, [
    _createVNode("span", {
      onClick: _cache[1] || (_cache[1] = $event => (_ctx.onClick($event)))
    }, _toDisplayString(_ctx.msg), 1 /* TEXT */)
  ]))
}
cache[1],会自动生成并缓存一个内联函数,“神奇”的变为一个静态节点。
并且支持手写内联函数:
<div>
  <span @click="()=>foo()">
    {{msg}}
  </span>
</div>
# 补充:PatchFlags枚举定义
而通过查询Ts枚举定义,我们可以看到分别定义了以下的追踪标记:
export const enum PatchFlags {

  TEXT = 1,// 表示具有动态textContent的元素
  CLASS = 1 << 1,  // 表示有动态Class的元素
  STYLE = 1 << 2,  // 表示动态样式(静态如style="color: red",也会提升至动态)
  PROPS = 1 << 3,  // 表示具有非类/样式动态道具的元素。
  FULL_PROPS = 1 << 4,  // 表示带有动态键的道具的元素,与上面三种相斥
  HYDRATE_EVENTS = 1 << 5,  // 表示带有事件监听器的元素
  STABLE_FRAGMENT = 1 << 6,   // 表示其子顺序不变的片段(没懂)。
  KEYED_FRAGMENT = 1 << 7, // 表示带有键控或部分键控子元素的片段。
  UNKEYED_FRAGMENT = 1 << 8, // 表示带有无key绑定的片段
  NEED_PATCH = 1 << 9,   // 表示只需要非属性补丁的元素,例如ref或hooks
  DYNAMIC_SLOTS = 1 << 10,  // 表示具有动态插槽的元素
  // 特殊 FLAGS -------------------------------------------------------------
  HOISTED = -1,  // 特殊标志是负整数表示永远不会用作diff,只需检查 patchFlag === FLAG.
  BAIL = -2 // 一个特殊的标志,指代差异算法(没懂)
}
感兴趣的可以看源码:packages/shared/src/patchFlags.ts
# tree-shaking
vue 包模块按需引入
很多时候,我们并不需要 vue提供的所有功能,在 vue 2 并没有方式排除掉,但是 3.0 都可能做成了按需引入。
import { ref, onMounted, onUnmounted } from 'vue'
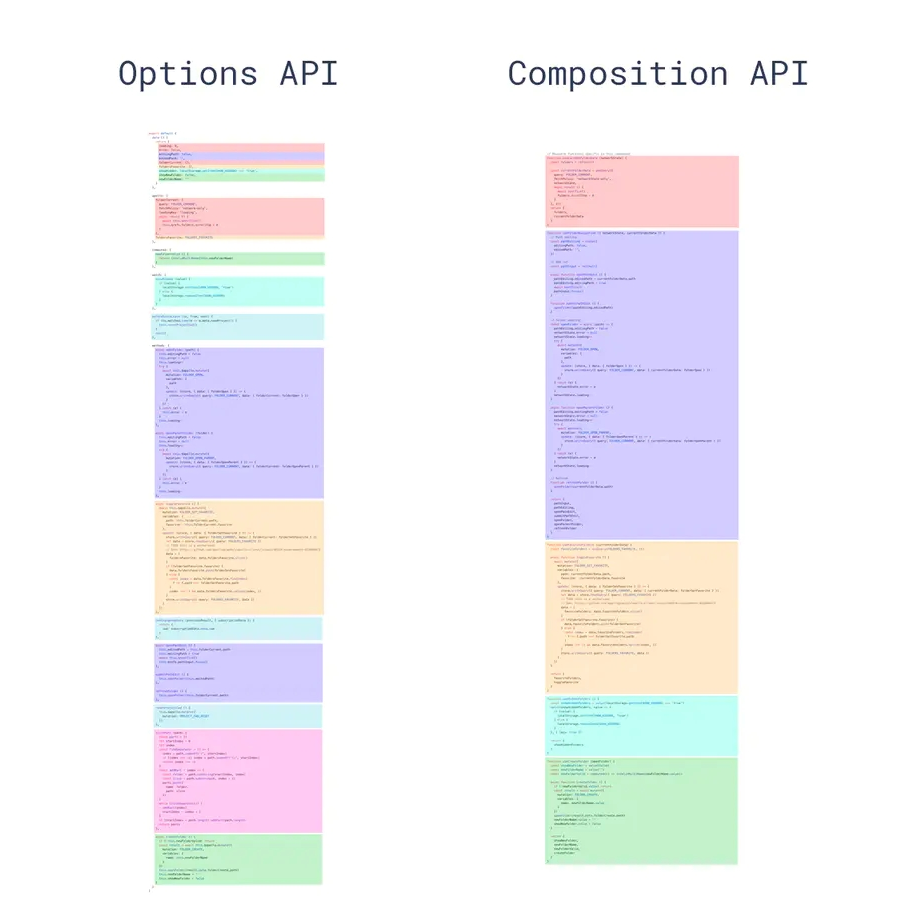
# Composition API
当两个或多个组件的逻辑相同或相似时,在vue2.x中我们考虑用mixin、HOC(高阶组件,Vue较少用到)、slot插槽来做逻辑复用。但这几种方式都有各自的弊端:
- 不知道代码引用来源
- 与引入的组件属性或方法命名冲突
HOC和slot需要额外的有状态的组件实例,从而使得性能有所损耗。
使用composition api能做到更清晰的逻辑复用
import { ref, onMounted, onUnmounted } from 'vue'

export function useMousePosition() {
  const x = ref(0)
  const y = ref(0)

  function update(e) {
    x.value = e.pageX
    y.value = e.pageY
  }

  onMounted(() => {
    window.addEventListener('mousemove', update)
  })

  onUnmounted(() => {
    window.removeEventListener('mousemove', update)
  })

  return { x, y }
}
在组件中引入函数
import { useMousePosition } from './mouse'

export default {
  setup() {
    const { x, y } = useMousePosition()
    // 其他逻辑...
    return { x, y }
  },
}
这里:
- 所有的数据来源都非常清晰
- 可以通过解构重命名,不存在命名冲突
- 不再需要仅为逻辑复用而创建的组件实例
# 更好的ts 支持
Vue 3是用TypeScript编写的库,可以享受到自动的类型定义提示- 支持
TSX
# Custom Renderer API
- 正在进行
NativeScript Vue集成 - 用户可以尝试
WebGL自定义渲染器,与普通Vue应用程序一起使用(Vugel)。
意味着以后可以通过 vue, Dom 编程的方式来进行 webgl 编程 。感兴趣可以看这里:Getting started vugel (opens new window)
# 其它
# 体积
小了很多,Vue2 34.8kb,Vue3 10几kb
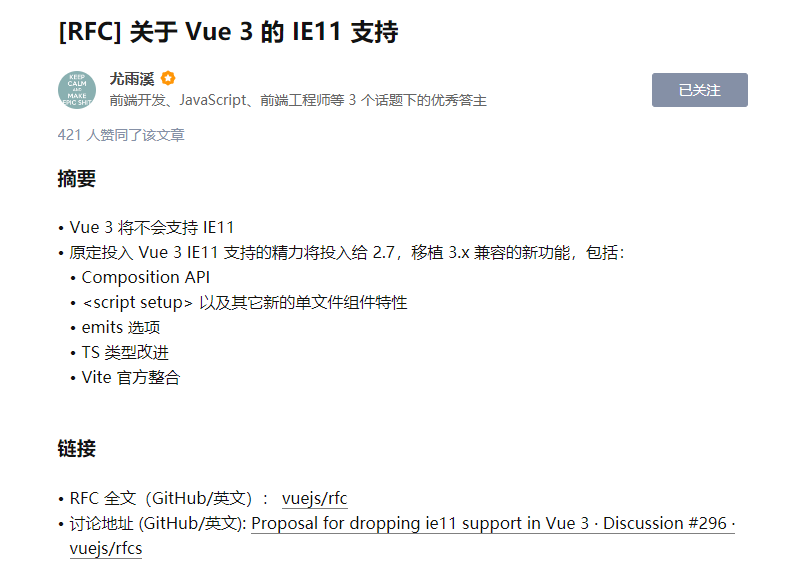
# 兼容性
因为用了proxy,ie不再兼容

# 初始化项目
npm i @vue/cli -g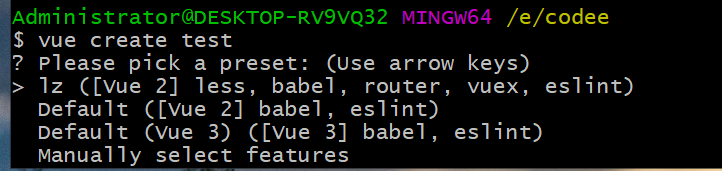


<template>
  <div>
    <p>{{ nameString }}</p>
    <p>{{ child }}</p>
    <button @click="comClick">button</button>
  </div>
</template>

<script>
import Vue from 'vue'
import Component from 'vue-class-component'

@Component({
  props: {
    child: String
  },
  watch:{

  },
  components: {

  }
})
export default class ComponentA extends Vue {
  // initial data
  nameString = `ComponentA`

  // lifecycle hook
  mounted () {
  this.greet()
  }

  // computed
  get computedMsg () {
  return 'computed ' + this.nameString
  }

  // method
  greet () {
  console.log('greeting: ' + this.nameString)
  }

}
</script>

<style>

</style>
支持jsx


# 使用tsx
npm i @vue/babel-plugin-jsx -Dbabel.config.js中添加plugins: ['@vue/babel-plugin-jsx']写法
App.tsx
import { defineComponent, ref, reactive } from 'vue'
export default defineComponent({
  setup () {
    const num = ref(0)
    const name = reactive({
      man: 'xx'
    })
    setInterval(() => {
      num.value++
    }, 1000)
    return () => {
      // const number = num.value
      return (
        <div>
          <p>{name.man}</p>
          <p>{num.value}</p>
        </div>
      )
    }
  }
})
# 新API
# setup
setup函数是一个新的选项。作为在组件内使用Composition Api的入口点。下面我们分为4个方面来讲解它
# 调用时机
官方文档说是围绕 beforeCreate 和 created 生命周期钩子运行的,很模糊。直接来打印看下顺序吧
setup () {
  console.log('setup')
},
created () {
  console.log('created')
},
beforeCreate () {
  console.log('beforeCreate')
}
结果:

实验证明setup是最先执行的,不过vue3并没有导出beforeCreate、created的生命周期方法,照着官方说的做吧。
# this指向
由于不能在setup函数中使用data、methods,为了避免使用Vue出错,所以把setup函数中this修改为了undefined。
<template>
  <div>xx</div>
</template>
<script>
export default {
  name: 'App',
  setup() {
    console.log(this); // undefined
  }
}
</script>
查看源码,可以发现,判断是否存在setup,存在时将props和ctx传入setup并直接调用,然后将setup的返回值挂载到组件实例的setupState上。
简化版源码:
const { setup } = Component;
if (setup) {

  const setupResult =
    setup && setup(shallowReadonly(instance.props), setupContext);

  // 处理 setupResult
  handleSetupResult(instance, setupResult);
}
这不同于vue2,像methods中的this指向,是在组件初始化时动态bind的实例作为this的。
function initMethods(vm, methods) {
    for (var key in methods) {
        vm[key] =
            methods[key] == null ?
            noop :
            bind(methods[key], vm);
    }
}
可以看看bind源码
function polyfillBind(fn, ctx) {
    function boundFn(a) {
        var l = arguments.length;
        return l ?
            (
                l > 1 ?
                fn.apply(ctx, arguments) :
                fn.call(ctx, a)
            ):
            fn.call(ctx)
    }
    boundFn._length = fn.length;
    return boundFn
}

function nativeBind(fn, ctx) {
    return fn.bind(ctx)

}

var bind = Function.prototype.bind ?
    nativeBind :
    polyfillBind;
# 函数参数
props
接收组件传递过来的所有数据,并且都是响应式的。
<template>
  <div>xx</div>
</template>
<script>
export default {
  name: 'App',
  props: {
      title: {
          type: String
      }
  },
  setup(props) {
    console.log(props.title)
  }
}
</script>
注意一点,props数据不能使用解构,否则响应式数据失效
<template>
  <div>蛙人</div>
</template>
<script>
export default {
  name: 'App',
  props: {
      title: {
          type: String
      }
  },
  setup({ title }) {
    console.log(title) // 这里响应式数据将失效
  }
}
</script>
context
该参数提供一个上下文对象,从原来的2.x中选择性的暴露了一些属性。
- attrs
- slots
- emit
- expose
<template>
  <div>xx</div>
</template>
<script>
export default {
  name: 'App',
  props: {
      title: {
          type: String
      }
  },
  setup(props, { attrs, slots, emit, expose } ) {
    console.log(attrs)
  }
}
</script>
上面,attrs和slots都是内部组件实例上对应项的代理,可以确保在更新后仍然还是最新的值。所以这里可以使用解构语法。
attrs还跟以前一样,在props中接收了就不会出现在这里。
slots就是插槽
# 返回值
这里有两种
函数
setup () {
  return () => h('div', 'haha')
}
对象
来看简化版源码
function handleSetupResult(instance, setupResult) {
  // setup 返回值不一样的话,会有不同的处理
  if (typeof setupResult === "function") {
    // 如果返回的是 function 的话,那么绑定到 render 上
    // 认为是 render 逻辑
    // setup(){ return ()=>(h("div")) }
    instance.render = setupResult;
  } else if (typeof setupResult === "object") {
    // 返回的是一个对象的话
    // 先存到 setupState 上
    // 使用 @vue/reactivity 里面的 proxyRefs
    // 方便用户直接访问 ref 类型的值
    // 比如 setupResult 里面有个 count 是个 ref 类型的对象,用户使用的时候就可以直接使用 count 了,而不需要在 count.value
    // 这里也就是官网里面说到的自动结构 Ref 类型
    instance.setupState = proxyRefs(setupResult);
  }
}
# 生命周期钩子函数
Vue2的写法仍然适用
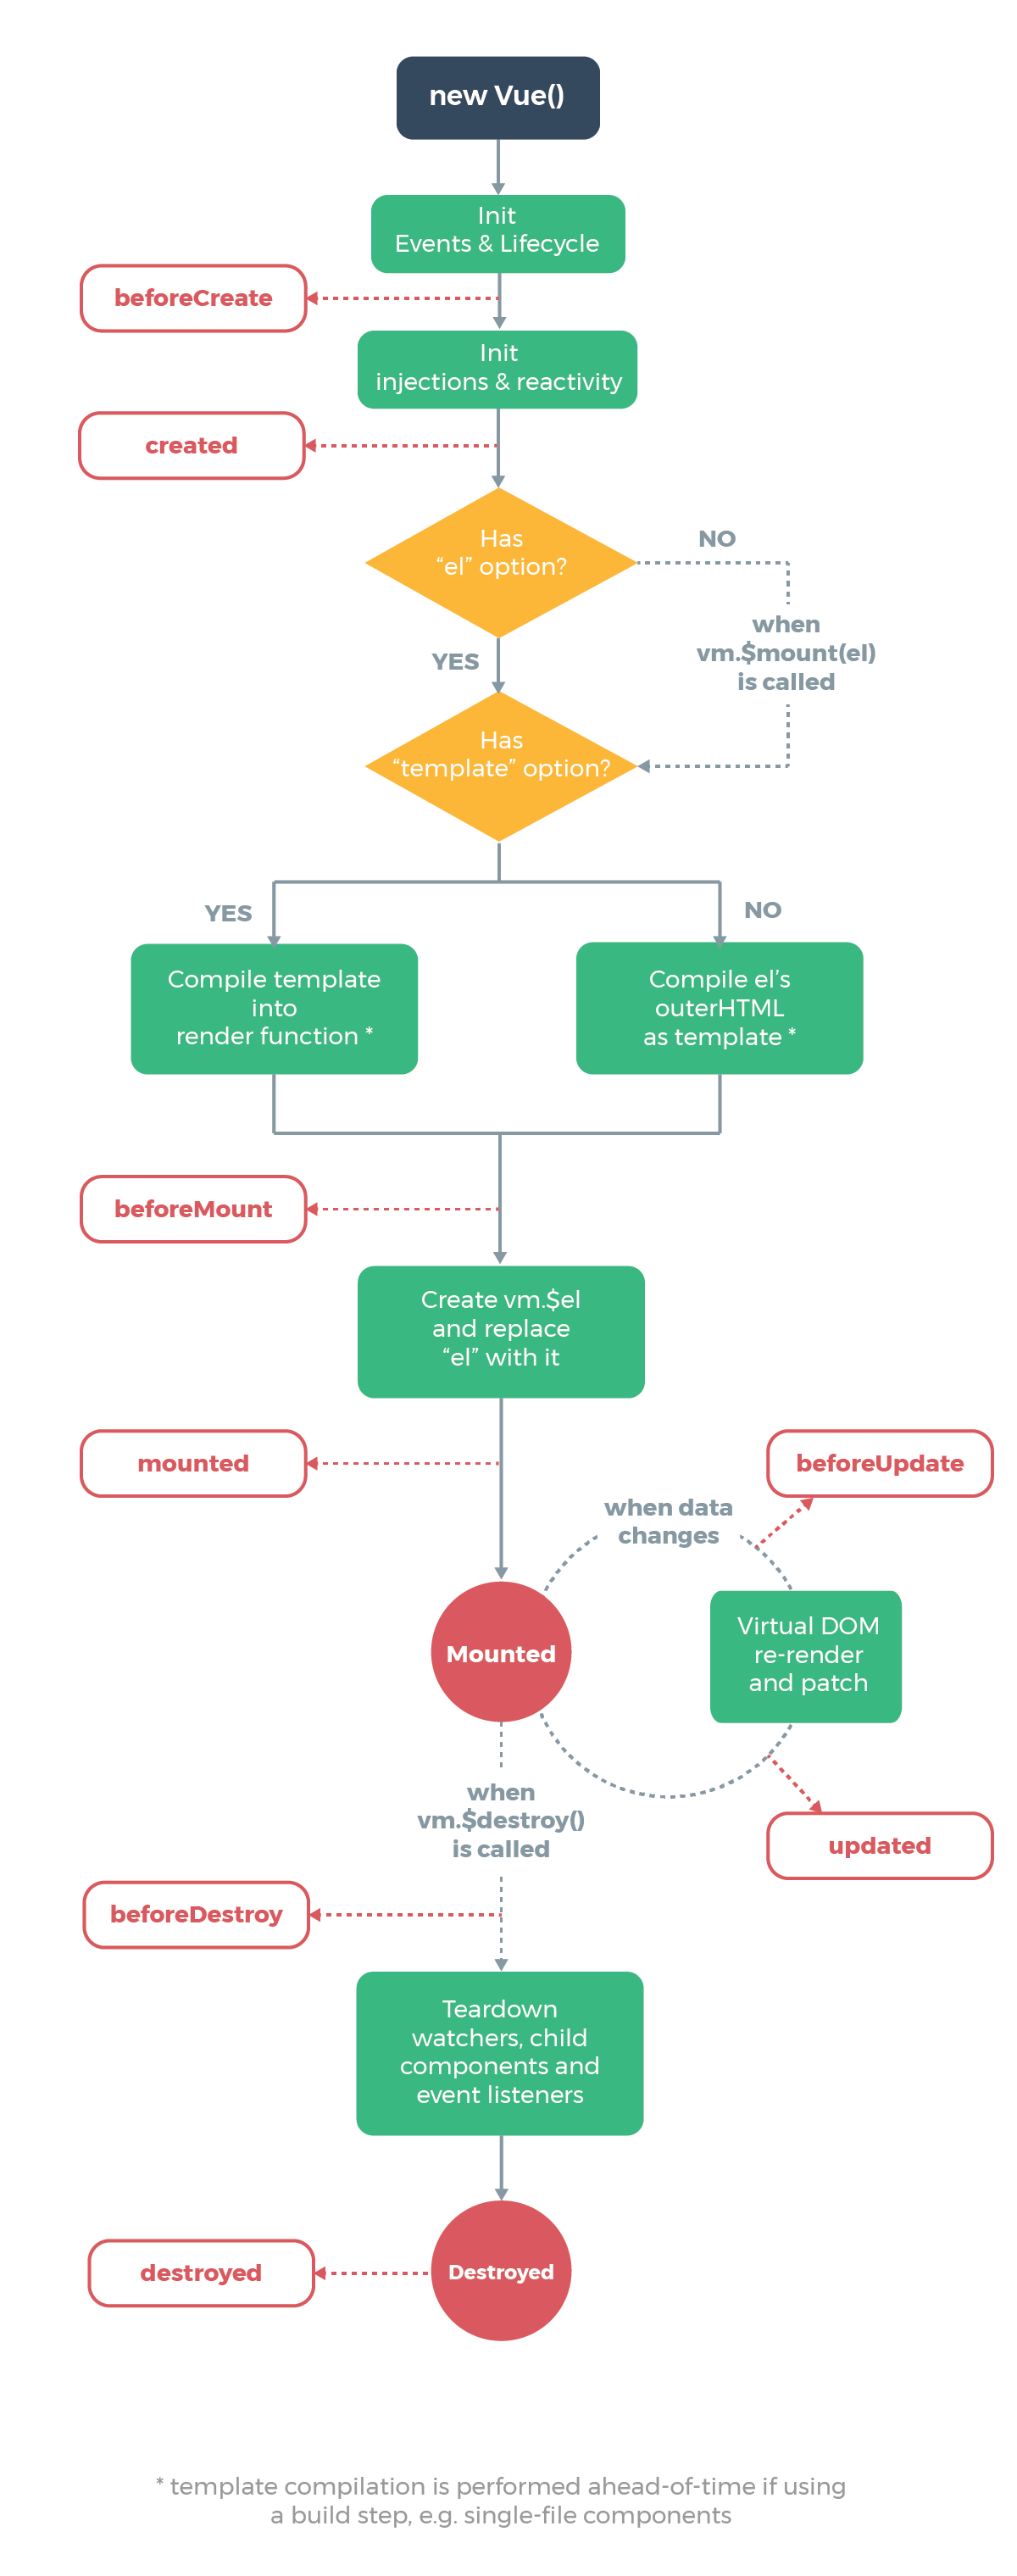
下表包含如何在 setup () (opens new window) 内部调用生命周期钩子:
| 选项式 API | Hook inside setup |
|---|---|
beforeCreate | Not needed* |
created | Not needed* |
beforeMount | onBeforeMount |
mounted | onMounted |
beforeUpdate | onBeforeUpdate |
updated | onUpdated |
beforeUnmount | onBeforeUnmount |
unmounted | onUnmounted |
errorCaptured | onErrorCaptured |
renderTracked | onRenderTracked |
renderTriggered | onRenderTriggered |
activated | onActivated |
deactivated | onDeactivated |
TIP
因为 setup 是围绕 beforeCreate 和 created 生命周期钩子运行的,所以不需要显式地定义它们。换句话说,在这些钩子中编写的任何代码都应该直接在 setup 函数中编写。
这些函数接受一个回调函数,当钩子被组件调用时将会被执行:
// MyBook.vue

export default {
  setup() {
    // mounted
    onMounted(() => {
      console.log('Component is mounted!')
    })
  }
}
# 响应式系统 API
# reactive
该方法接收一个参数{}创建一个响应式对象。跟Vue2.x的Vue.observable一样。如果该参数不是对象的话,也可以渲染到模板上,但不是响应式的数据。
响应式转换是“深层的”:会影响对象内部所有嵌套的属性。基于 ES2015 的 Proxy 实现,返回的代理对象不等于原始对象。建议仅使用代理对象而避免依赖原始对象。
<template>
  <div class="test">
    <div>姓名:  {{ name.value }}</div>
    <div>{{ test() }}</div>
  </div>
</template>

<script>
import { reactive } from 'vue'
export default {
  name: 'test',
  setup () {
    const name = reactive({ value: 'xx' })
    function test () {
      name.value = 'abc' // 该方法测试响应式数据,可以看到执行完该方法视图也会发生改变
    }
    return {
      name,
      test
    }
  }
}
</script>
# ref
该方法接收一个参数,可以是单个值,也可以是一个对象,并且都是响应式的数据。当传入一个对象时{},内部将调用reactive方法进行转换为响应式数据。返回值里面带有.value属性取值,当使用模板渲染的时候可省去.value。
说白了就是reactive({value: 原始数据})
<template>
  <div class="test">
    姓名:  {{ name }}
    {{ test() }}
  </div>
</template>

<script>
import { ref } from 'vue'
export default {
  name: 'test',
  setup () {
    const name = ref('xx')
    function test () {
      name.value = 'abc' // 只是渲染模板可以省略.value,但是在逻辑中还得写哦
    }
    return {
      name,
      test
    }
  }
}
</script>
# reactive、ref两者区别
两者分别适用场合:
ref可以为基本类型添加响应式,也可以为引用类型添加响应式,reactive只能为引用类型添加响应式。- 对于引用类型,什么时候用
ref,什么时候用reactive?简单说,如果你只打算修改引用类型的一个属性,那么推荐用reactive,如果你打算变量重赋值,那么一定要用ref。
# shallowReactive
打印的话,乍一看没有区别,但是,shallow的中文意义是“浅层的”,shallowReactive不代理深层property,只会指向原始对象的深层property。
注意,给shallowReactive传入Proxy是没有意义的,即便这么做,直接返回该Proxy。
shallowReactive的用途是:如果一个对象的深层不可能变化,那么就没必要深层响应,这时候用shallowReactive可以节省系统开销。
下例中,按下第2个button不会有反应,只有又去按下第1个button之后,视图刷新,第二个button才有反应。
<template>
<div>
  <button @click="r.b.c++">count is: {{ r.b.c }}</button>
  <button @click="s.b.c++">count is: {{ s.b.c }}</button>
</div>
</template>

<script>
import { reactive, shallowReactive } from "vue";
export default {
  setup() {
    let r = reactive({a: 1, b: {c: 2}});
    console.log(r);
    let s = shallowReactive({a: 1, b: {c: 2}});
    console.log(s);
    return {
      r,s
    };
  },
};
</script>
# shallowRef
shallowRef的作用是只对value添加响应式,因此,必须是value被重新赋值才会触发响应式。shallowRef的出现主要是为了节省系统开销。
下例中,点击button1会有反应,点击button2不会有反应。关键是点击button3,我们知道在<template>里,如果给s重新赋值,其实相当于给s.value重新赋值,由于value是响应式的,这时候button2和button3都会有变化。
<template>
  <div>
    <button @click="r.b.c++">count is: {{ r.b.c }}</button>
    <button @click="s.b.c++">count is: {{ s.b.c }}</button>
    <button @click="s = { a: 10, b: { c: 20 } }">count is: {{ s.b.c }}</button>
  </div>
</template>

<script>
import { ref, shallowRef } from 'vue'
export default {
  setup () {
    const r = ref({ a: 1, b: { c: 2 } })
    const s = shallowRef({ a: 1, b: { c: 2 } })
    return {
      r,
      s
    }
  }
}
</script>
# computed
该方法可以传入一个函数,默认该函数就是getter,不管getter返回值为一个ref响应式数据还是一个普通变量,数据都是只读不能改变。
<script>
import { ref, computed } from "vue"
export default {
 name: 'test',
 setup() {
    let name = ref("xx")
    let test = computed(() => name.value);
    test.value = "123" // 修改无效,只能只读
  }
}
</script>
如果修改了computed对象,则控制台会报一个警告
Write operation failed: computed value is readonly
传入一个对象set和get函数方法,这样就可以修改啦
<script>
import { ref, computed } from "vue"
export default {
 name: 'test',
 setup() {
    let name = ref("xx")
    let test = computed({
        get() {
            return name.value;
        },
        set(val) {
            return name.value = val;
        }
    });
    test.value = "123"
  }
}
</script>
# readonly
该方法接收传入一个对象,默认是只读功能,是深层对象只读,不管嵌套多少层的属性都是只读状态。
<script>
import { readonly } from "vue"
export default {
 name: 'test',
  setup() {
    let obj = {
        name: "xx",
        sex: "male",
        prodution: {
            proName: "音响"
        }
    }
    let only = readonly(obj)
    only.name = "yy" // 修改无效
    only.prodution.proName = "欢迎关注" // 修改无效
    console.log(only)
  }
}
</script>
# shallowReadonly
就像reactive与shallowReactive的一样,shallowReadonly只会给对象的第一层property设置只读,不去管深层property,因此深层property并没有被代理,只会指向原始对象。
下例中:
按下button1会有报错提示:Set operation on key "c" failed: target is readonly.,因为r是深层只读的。
按下button2没有任何反应,因为shallowReadonly的深层是指向原始值的,修改原始对象不会反映到视图上。
按下button3也会有报错提示:Set operation on key "a" failed: target is readonly.,因为shallowReadonly是浅层只读的,a恰好是浅层property。
<template>
<div>
  <button @click="r.b.c++">count is: {{ r.b.c }}</button>
  <button @click="s.b.c++">count is: {{ s.b.c }}</button>
  <button @click="s.a++">count is: {{ s.a }}</button>
</div>
</template>

<script>
import { readonly, shallowReadonly } from "vue";
export default {
  setup() {
    let r = readonly({a: 1, b: {c: 2}});
    console.log(r);
    let s = shallowReadonly({a: 1, b: {c: 2}});
    console.log(s);
    return {
      r,s
    };
  },
};
</script>
# watchEffect
该方法接收一个函数并且立即执行,并当该函数里的变量变更时,重新执行该函数。该方法无法获取到原值,只能是改变之后的值。
如果要监听哪个值,需要在该函数里写出来,否则监听无效
import { ref, watchEffect } from "vue"
export default {
 name: 'test',
  setup() {
    let name = ref("xx");
    let age = ref(23);
    watchEffect(() => {
        console.log(name.value)
        console.log(age.value)
    })

    setTimeout(() => {
        name.value = "yy"
    }, 5000)

    setTimeout(() => {
        age.value = 18
    }, 1000)
  }
}
</script>
取消监听
有时候我们想在触发一定的条件后取消监听。这时可以执行watchEffect的返回值。
import { ref, watchEffect } from "vue"
export default {
 name: 'test',
  setup() {
    let name = ref("xx");
    let age = ref(23);
    let stop = watchEffect(() => {
        name.value; // 监听name
        age.value;  // 监听age

        console.log(name.value)
        console.log(age.value)
    })

    setTimeout(() => {
        name.value = "yy"
    }, 5000)

    setTimeout(() => {
        age.value = 18;
        setTimeout(stop, 300)
    }, 1000)
  }
}
</script>
# watch
watch等同于Vue2.x中的this.$watch,watch需要监听特定数据,默认情况是懒执行,也就是只有当数据发生变化时才执行第二个参数函数。
对比WatchEffect ,Watch允许我们
- 懒执行函数
- 更明确哪些状态改变触发监听器
- 可以监听获取到变化前后的值
监听单个值
<script>
import { ref, watch } from "vue"
export default {
 name: 'test',
  setup() {
    let name = ref("蛙人");

    watch(name, (newVal, oldVal) => {
        console.log(newVal, oldVal) // 前端娱乐圈, 蛙人
    })

    setTimeout(() => {
        name.value = "前端娱乐圈"
    }, 1000)

  }
}
</script>
监听多个值
监听多个值,返回的是一个数组对象。
<script>
import { ref, watch } from "vue"
export default {
 name: 'test',
  setup() {
    let name = ref("蛙人");
    let age = ref(23);

    watch([name, age], (newVal, oldVal) => {
        console.log(newVal, oldVal) // ["前端娱乐圈", 18], ["蛙人", 23]
    })

    setTimeout(() => {
        name.value = "前端娱乐圈"
        age.value = 18
    }, 1000)

  }
}
</script>
# 事件emit
<template>
       <div>
           <p>hello world</p>
           <button @click = "go" class="btn btn-success">go</button>
       </div>
</template>


<script lang="ts">
import Vue from 'vue'
import {defineComponent} from "vue"
export default defineComponent({
    emits:['haha'],
   setup(prop,context){
       const methods = {
           go(){
               context.emit("haha")
           }
       }
       return {
           ...methods
       }
   }
})
</script>
之所以要写emits,是当发送的事件名与原生事件名相同时,会触发两次事件
不写emits事件也能发送出去,不过还是建议写上,一来解决冲突问题,二是可以更好的指示组件的工作方式,一眼就能看出来有什么事件会发送。
# 模板 Refs
该方法相当于Vue2.x的refs一样获取元素,那么在setup中配合使用ref对象进行获取
<template>
  <div class="test">
    <p ref="el">123</p>
  </div>
</template>

<script>
import { ref, onMounted } from "vue"
export default {
 name: 'test',
  setup() {
    let el = ref(null)
    onMounted(() => {
         console.log(el) // p标签元素
    })
    return {
        el
    }

  }
}
</script>
用起来感觉挺奇怪的。
先创建一个响应式对象,然后在template上用ref标上这个值,跟以前的写法还是有蛮大区别的
具体源码逻辑:
这里我们将 `root` 暴露在渲染上下文中,并通过 `ref="root"` 绑定到 `div` 作为其 `ref`。 在 Virtual DOM patch 算法中,如果一个 VNode 的 `ref` 对应一个渲染上下文中的 ref,则该 VNode 对应的元素或组件实例将被分配给该 ref。 这是在 Virtual DOM 的 mount / patch 过程中执行的,因此模板 ref 仅在渲染初始化后才能访问。

ref 被用在模板中时和其他 ref 一样:都是响应式的,并可以传递进组合函数(或从其中返回)。
在 v-for 中使用
模板 ref 在 v-for 中使用 vue 没有做特殊处理,需要使用函数型的 ref(3.0 提供的新功能)来自定义处理方式:
<template>
  <div v-for="(item, i) in list" :ref="el => { divs[i] = el }">
    {{ item }}
  </div>
</template>

<script>
  import { ref, reactive, onBeforeUpdate } from 'vue'

  export default {
    setup() {
      const list = reactive([1, 2, 3])
      const divs = ref([])

      // 确保在每次变更之前重置引用
      onBeforeUpdate(() => {
        divs.value = []
      })

      return {
        list,
        divs,
      }
    },
  }
</script>
在2.x中对v-for元素使用ref,获取的是该循环出来的dom组成的数组,现在实验了一下,出来的是最后一个元素了。
# Provide && Inject
该方法和Vue2.x的 provide、inject一样的。但是Vue3新特性这俩方法只能在setup中使用。
- Provide:接收2个参数,第一个
key值,第二个value值,进行传递 - Inject:接收2个参数,第一个是
provide的key值,默认第二个参数可选,可以设置默认值(当找不到key值,设置一个默认值)
App.vue
<script>
import test from "./components/test"
import { provide, ref } from "vue"
export default {
  name: 'App',
  components: {
    test
  },
  setup() {
    let name = ref("蛙人")
    provide("name", name) // 传入一个响应式数据
  },
}
</script>
test.vue
<template>
	{{ NAME }}
</template>
<script>
import { inject, ref } from "vue"
export default {
 name: 'test',
  setup() {
    let NAME = inject("name")
    console.log(NAME)

    let title = inject("key", ref(123))
    console.log(title) // 这时就会触发默认值,因为这里找不到这个key值

    return {
        NAME
    }
  }
}
</script>
- 只要是App.vue的子孙组件,都能inject到
- 子组件有provide父组件同名的,则优先最近的
- 子组件修改ref来的,会直接修改源数据
# 响应式系统工具集
# unref
如果参数是一个 ref 则返回它的 value,否则返回参数本身。它是 val = isRef(val) ? val.value : val 的语法糖。
function useFoo(x: number | Ref<number>) {
  const unwrapped = unref(x) // unwrapped 一定是 number 类型
}
# toRef
toRef 可以用来为一个 reactive 对象的属性创建一个 ref。这个 ref 可以被传递并且能够保持响应性。
const state = reactive({
  foo: 1,
  bar: 2,
})

const fooRef = toRef(state, 'foo')

fooRef.value++
console.log(state.foo) // 2

state.foo++
console.log(fooRef.value) // 3
当您要将一个 prop 中的属性作为 ref 传给组合逻辑函数时,toRef 就派上了用场:
export default {
  setup(props) {
    useSomeFeature(toRef(props, 'foo'))
  },
}
# toRefs
把一个响应式对象转换成普通对象,该普通对象的每个 property 都是一个 ref ,和响应式对象 property 一一对应。
const state = reactive({
  foo: 1,
  bar: 2,
})

const stateAsRefs = toRefs(state)
/*
stateAsRefs 的类型如下:

{
  foo: Ref<number>,
  bar: Ref<number>
}
*/

// ref 对象 与 原属性的引用是 "链接" 上的
state.foo++
console.log(stateAsRefs.foo) // 2

stateAsRefs.foo.value++
console.log(state.foo) // 3
当想要从一个组合逻辑函数中返回响应式对象时,用 toRefs 是很有效的,该 API 让消费组件可以 解构 / 扩展(使用 ... 操作符)返回的对象,并不会丢失响应性:
function useFeatureX() {
  const state = reactive({
    foo: 1,
    bar: 2,
  })

  // 对 state 的逻辑操作

  // 返回时将属性都转为 ref
  return toRefs(state)
}

export default {
  setup() {
    // 可以解构,不会丢失响应性
    const { foo, bar } = useFeatureX()

    return {
      foo,
      bar,
    }
  },
}
# isRef
检查一个值是否为一个 ref 对象。
# isProxy
检查一个对象是否是由 reactive 或者 readonly 方法创建的代理。
# isReactiv
检查一个对象是否是由 reactive 创建的响应式代理。
如果这个代理是由 readonly 创建的,但是又被 reactive 创建的另一个代理包裹了一层,那么同样也会返回 true。
# isReadonly
检查一个对象是否是由 readonly 创建的只读代理。
# v-model
# 自定义写法
Input.vue
<template>
  <input type="text" :value="title" @input="input">
</template>

<script>
import { defineComponent } from 'vue'

export default defineComponent({
  name: 'Input',
  props: {
    title: {
      default: () => 'haha'
    }
  },
  model: {
    prop: 'title',
    event: 'inputSome'
  },
  methods: {
    input (e) {
      this.$emit('inputSome', e.target.value)
    }
  }
})
</script>
父组件
<Input v-model="title"></Input>
可以见得,在父组件是不关心子组件用什么值来接收。子组件写好model即可。
下面来看看Vue3的写法:
Input.vue
<template>
  <input type="text" :value="title" @input="input">
</template>

<script>
import { defineComponent } from 'vue'

export default defineComponent({
  name: 'Input',
  props: {
    title: {
      default: () => 'haha'
    }
  },
  methods: {
    input (e) {
      this.$emit('update:title', e.target.value)
    }
  }
})
</script>
父组件
<Input v-model:title="title"></Input>
父组件中需指定子组件用于接收值的键名,子组件通过发送update:键名来告知父组件值发生了变化
# 绑定多个
父组件
<template>
  {{title}}
  {{name}}

  <Input v-model:title="title" v-model:name="name"/>
</template>

<script>
import Input from "./components/Input"
export default {
  name: 'App',
  components: {
    Input,
  },
  data() {
    return {
      title: "haha",
      name: "www"
    }
  },
}
</script>
子组件
<template>
  <div class="Input">
      <input type="text" @input="first" :value="title">
      <input type="text" @input="last" :value="name">
  </div>
</template>
<script>
export default {
 name: 'Input',
  props: {
    title: {
        default: () => "xx"
    },
    name: {
        default: () => "11"
    }
  },
  methods: {
      first(e) {
          this.$emit("update:title", e.target.value)
      },
      last(e) {
          this.$emit("update:name", e.target.value)
      }
  }
}
</script>
这么看来,就相当于之前的sync修饰符的写法:
父组件
<Input :startTime.sync="startDate"></Input>
子组件发送事件
this.$emit('update:startTime', this.start)
只不过把sync名字改成了v-model而已
# 新增修饰符
Vue3.x中,添加了可以自定义修饰符,如Api提供的内置方法.trim,新特性我们也可以自定义啦。下面就来演示一下写一个转换字符串大写的修饰符。
App.vue
<template>
  <Input v-model:str.capitalize="modelModifiers"/>
</template>
<script>
import Input from "./components/Input"
export default {
  name: 'App',
  components: {
    Input
  }
}
</script>
Input.vue
<template>
  <div class="Input">
    <input type="text" @input="send">
  </div>
</template>

<script>
export default {
 name: 'Input',
  props: {
      str: String,
      strModifiers: {
          default: () => ({})
      }
  },
  methods: {
      send(e) {
          let value = e.target.value
          if (this.strModifiers.capitalize) { // capitalize 这里的值就是修饰符
            value = value.toUpperCase()
            console.log(value)
          }
          this.$emit("update:str", value)
      }
  }
}
</script>
上面方法,modifiers 必须传入,必须写定义为一个空对象。
特别需要注意一点:如果你的
v-model参数值为str,那么组件里面接收的值,全部为str开头,如:props里面的 strModifiers,str挺奇怪的写法
# 自定义指令更改
在Vue3.x中自定义指定写法稍有更改,看下列。
- bind --> beforeMount 指令绑定到元素后发生。只发生一次
- inserted --> mounted 元素插入到父DOM后发生
- beforeUpdate: Vue3.x新添加的,这是在元素更新之前调用,
- componentUpdated --> updated
- beforeUnmount : Vue3.x新添加的,将在卸载元素前调用
- unbind --> unmounted
main.js
import { createApp } from 'vue'
import App from './App.vue'

let main = createApp(App)
main.directive("custom", {
    beforeMount(el, attr) {
        console.log(el, attr)
    },
    updated() {
        console.log("updated")
    },
    unmounted() {
        console.log("移除")
    }
})
main.mount('#app')
App.vue
<template>
  <p v-custom v-if="show"></p>
</template>
<script>
export default {
  name: 'App',
  data() {
    return {
      show: true
    }
  },
  created() {
    setTimeout(() => {
      this.show = true;
    }, 5000)

    setTimeout(() => {
      this.show = false
    }, 3000)
  }
}
</script>
# Teleport
Teleport 是 Vue3.x 新推出的功能, 没听过这个词的小伙伴可能会感到陌生;翻译过来是传送的意思,可能还是觉得不知所以,没事下边我就给大家形象的描述一下。
# Teleport 是什么呢?
Teleport 就像是哆啦 A 梦中的「任意门」,任意门的作用就是可以将人瞬间传送到另一个地方。有了这个认识,我们再来看一下为什么需要用到 Teleport 的特性呢,看一个小例子: 在子组件Header中使用到Dialog组件,我们实际开发中经常会在类似的情形下使用到 Dialog ,此时Dialog就被渲染到一层层子组件内部,处理嵌套组件的定位、z-index和样式都变得困难。 Dialog从用户感知的层面,应该是一个独立的组件,从 dom 结构应该完全剥离 Vue 顶层组件挂载的 DOM;同时还可以使用到 Vue 组件内的状态(data或者props)的值。简单来说就是,即希望继续在组件内部使用Dialog, 又希望渲染的 DOM 结构不嵌套在组件的 DOM 中。 此时就需要 Teleport 上场,我们可以用``包裹Dialog, 此时就建立了一个传送门,可以将Dialog渲染的内容传送到任何指定的地方。 接下来就举个小例子,看看 Teleport 的使用方式
# Teleport 的使用
我们希望 Dialog 渲染的 dom 和顶层组件是兄弟节点关系, 在index.html文件中定义一个供挂载的元素:
<body>
  <div id="app"></div>
  <div id="dialog"></div>
</body>
定义一个Dialog组件Dialog.vue, 留意 to 属性, 与上面的id选择器一致:
<template>
  <teleport to="#dialog">
    <div class="dialog">
      <div class="dialog_wrapper">
        <div class="dialog_header" v-if="title">
          <slot name="header">
            <span>{{ title }}</span>
          </slot>
        </div>
      </div>
      <div class="dialog_content">
        <slot></slot>
      </div>
      <div class="dialog_footer">
        <slot name="footer"></slot>
      </div>
    </div>
  </teleport>
</template>
最后在一个子组件Header.vue中使用Dialog组件, 这里主要演示 Teleport 的使用,不相关的代码就省略了。header组件
<div class="header">
    ...
    <navbar />
    <Dialog v-if="dialogVisible"></Dialog>
</div>
...
我们使用 teleport 组件,通过 to 属性,指定该组件渲染的位置与 #app同级,也就是在 body 下,但是 Dialog 的状态 dialogVisible 又是完全由内部 Vue 组件控制.
# 对比
像ext、element的弹窗直接就是在根节点下的,思路大致都是找到根节点再往其下添加节点。
相比之下倒是觉得teleport不是很实用,还需要事先写好个dom,根据id去找
# Suspense
Suspense是 Vue3.x 中新增的特性, 那它有什么用呢?别急,我们通过 Vue2.x 中的一些场景来认识它的作用。 Vue2.x 中应该经常遇到这样的场景:
<template>
<div>
    <div v-if="!loading">
        ...
    </div>
    <div v-if="loading">
        加载中...
    </div>
</div>
</template>
复制代码
在前后端交互获取数据时, 是一个异步过程,一般我们都会提供一个加载中的动画,当数据返回时配合v-if来控制数据显示。 如果你使用过vue-async-manager这个插件来完成上面的需求, 你对Suspense可能不会陌生,Vue3.x 感觉就是参考了vue-async-manager. Vue3.x 新出的内置组件Suspense, 它提供两个template slot, 刚开始会渲染一个 fallback 状态下的内容, 直到到达某个条件后才会渲染 default 状态的正式内容, 通过使用Suspense组件进行展示异步渲染就更加的简单。
warning 如果使用 Suspense, 要返回一个 promise
# 使用:
  <Suspense>
        <template #default>
            <async-component></async-component>
        </template>
        <template #fallback>
            <div>
                Loading...
            </div>
        </template>
  </Suspense>
asyncComponent.vue:
<<template>
<div>
    <h4>这个是一个异步加载数据</h4>
    <p>用户名:{{user.nickname}}</p>
    <p>年龄:{{user.age}}</p>
</div>
</template>

<script>
import { defineComponent } from "vue"
import axios from "axios"
export default defineComponent({
    setup(){
        const rawData = await axios.get("http://xxx.xinp.cn/user")
        return {
            user: rawData.data
        }
    }
})
</script>
从上面代码来看,Suspense 只是一个带插槽的组件,只是它的插槽指定了default 和 fallback 两种状态。
# 对比
与写在axios中,自动显示loading效果相比,Suspense可能更适合pc端,像之前控制器的就有组件内部的loading效果,可以基于此封装一个通用的组件
# Fragment
Vue3.x中将不在限制模板中只有一个根节点,根组件可以任意多个元素。
<template>
    <div>首页</div>
    <div>新闻</div>
</template>
之前限制只能一个根节点,根据 Vue 贡献者 Linus Borg 的说法:
“允许 fragments 需要大幅改动比较算法……不仅需要它能正常工作,还要求它有较高的性能……这是一项相当繁重的任务……React 直到完全重写了渲染层才消除了这种限制。”
# 全局方法
import { createApp } from 'vue'
import App from './App.vue'

const app = createApp(App);

// 设置全局
app.config.globalProperties.$xxx = 'xxx';


//使用
import {reactive, onMounted, getCurrentInstance } from "vue";
setup() {
    const { ctx, proxy}  = getCurrentInstance();
    console.log(ctx.$xxx) // xxx
}
# 改动的api
# 移除过滤器filters
在Vue3.x中移除过滤器,不在支持。建议使用computed去替代。贴一个官网例子
<template>
  <h1>Bank Account Balance</h1>
  <p>{{ accountInUSD }}</p>
</template>

<script>
  export default {
    props: {
      accountBalance: {
        type: Number,
        required: true
      }
    },
    computed: {
      accountInUSD() {
        return '$' + this.accountBalance
      }
    }
  }
</script>
可能因为要精简代码,并且filter功能重复,filter能实现的功能,methods和计算属性基本上也可以实现。所以就干脆把filter这方面的vue源码给删掉了
# 废弃on,off,once实例方法
Vue3.x中 $on,$off 和 $once 实例方法已被移除,应用实例不再实现事件触发接口。
<script>
	created() {
        console.log(this.$on, this.$once, this.$off) // undefined undefined undefined
	}
</script>
也就是说之前new Vue来做eventbus已经行不通了
Vue3.x推荐使用外部库mitt (opens new window)来代替 $on $emit $off
接下来部分是解读 mitt 源码
mitt源码 (opens new window)使用的是typescript编写的,源码加注释一共不到90行,阅读起来比较轻松。typescript不是本次的重点,所以我将mitt源码以js的形式展示如下。
/**
 * 向外暴露的默认函数
 * @param 入参为 EventHandlerMap 对象 (ts真香,我们能清楚的知道参数的类型是什么,返回值是什么)
 * @returns 返回一个对象,对象包含属性 all,方法 on,off,emit
 */
export default function mitt (all) {
  /*
    此处实参可传一个EventHandlerMap对象,实现多个 mitt 的合并。例如:
    const m1 = mitt();
    m1.on('hi', () => { console.log('Hi, I am belongs to m1.'); });

    const m2 = mitt(m1.all);
    m2.emit('hi') // Hi, I am belongs to m1.
    m2.on('hello', () => { console.log('Hello, I am belongs to m2.'); });

    m1.emit('hello'); // Hello, I am belongs to m2.

    m1.all === m2.all // true
  */
  all = all || new Map();

  return {
    // 事件键值对映射对象
    all,

    /**
     * 注册一个命名的事件处理
     * @param type 事件名,官方表示事件名如是 *,用来标记为通用事件,调用任何事件,都会触发命名为 * 的事件
     * @param handler 事件处理函数
     */
    on (type, handler) {
      // 根据type去查找事件
      const handlers = all.get(type);
      // 如果找到有相同的事件,则继续添加,Array.prototype.push 返回值为添加后的新长度,
      const added = handlers && handlers.push(handler);
      // 如果已添加了type事件,则不再执行set操作
      if (!added) {
        all.set(type, [handler]); // 注意此处值是数组类型,可以添加多个相同的事件
      }
    },

    /**
     * 移除指定的事件处理
     * @param type 事件名,和第二个参数一起用来移除指定的事件,
     * @param handler 事件处理函数
     */
    off (type, handler) {
      // 根据type去查找事件
      const handlers = all.get(type);
      // 如果找到则进行删除操作
      if (handlers) {
        // 这里用了个骚操作,其实就是找到了,则删除(多个相同的只会删除找到的第一个),没找到则不会对原数组有任何影响
        handlers.splice(handlers.indexOf(handler) >>> 0, 1);
      }
    },

    /**
     * 触发所有 type 事件,如果有type为 * 的事件,则最后会执行。
     * @param type 事件名
     * @param evt 传递给处理函数的参数
     */
    emit (type, evt) {
      // 找到type的事件循环执行
      (all.get(type) || []).slice().map((handler) => { handler(evt); });
      // 然后找到所有为*的事件,循环执行
      (all.get('*') || []).slice().map((handler) => { handler(type, evt); });
    }
  };
}
代码还是相当的精简的,麻雀虽小,五脏俱全。
接下来我们写几个例子来小牛试刀。
// emit 不是单例
const m1 = mitt();
const m2 = mitt();
m1 === m2; // false

// 多个mitt之间可以实现合并,合并后的mitt的all属性指向的是同一个内存地址
const m3 = mitt(m2.all);
m3.all === m2.all; // true

m2.on('hi', () => { console.log('我是m2'); });
m3.emit('hi'); // 我是m2

m2.on('*', () => { console.log('我是公共的'); });
m2.emit('hi');
// 我是m2
// 我是公共的
到此我们已经学会如果使用 emitt 以及如何使用它了。
# 移除$set、$delete
# Router
# Vue2.x版本
// 0. 如果使用模块化机制编程,导入Vue和VueRouter,要调用 Vue.use(VueRouter)

// 1. 定义 (路由) 组件。
// 可以从其他文件 import 进来
const Foo = { template: '<div>foo</div>' }
const Bar = { template: '<div>bar</div>' }

// 2. 定义路由
// 每个路由应该映射一个组件。 其中"component" 可以是
// 通过 Vue.extend() 创建的组件构造器,
// 或者,只是一个组件配置对象。
// 我们晚点再讨论嵌套路由。
const routes = [
  { path: '/foo', component: Foo },
  { path: '/bar', component: Bar }
]

// 3. 创建 router 实例,然后传 `routes` 配置
// 你还可以传别的配置参数, 不过先这么简单着吧。
const router = new VueRouter({
  mode: 'hash',
  routes // (缩写) 相当于 routes: routes
})

// 4. 创建和挂载根实例。
// 记得要通过 router 配置参数注入路由,
// 从而让整个应用都有路由功能
const app = new Vue({
  router
}).$mount('#app')
# Vue3版本
router.ts
import { createRouter, createWebHashHistory, RouteRecordRaw } from 'vue-router'
import Home from '../views/Home.vue'

const routes: Array<RouteRecordRaw> = [
  {
    path: '/',
    name: 'Home',
    component: Home
  },
  {
    path: '/about',
    name: 'About',
    // route level code-splitting
    // this generates a separate chunk (about.[hash].js) for this route
    // which is lazy-loaded when the route is visited.
    component: () => import(/* webpackChunkName: "about" */ '../views/About.vue')
  }
]

const router = createRouter({
  history: createWebHashHistory(),
  routes
})

export default router
app.ts
import { createApp } from 'vue'
import App from './App'
import router from './router'
import store from './store'

createApp(App).use(store).use(router).mount('#app')
# VueX
# Vue2.x版本
import Vue from 'vue'
import Vuex from 'vuex'

Vue.use(Vuex)

const store = new Vuex.Store({
  state: {
    count: 0
  },
  mutations: {
    increment (state) {
      state.count++
    }
  }
})
# Vue3版本
store.ts
import { createStore } from 'vuex'

export default createStore({
  state: {
  },
  mutations: {
  },
  actions: {
  },
  modules: {
  }
})
app.ts
import { createApp } from 'vue'
import App from './App'
import router from './router'
import store from './store'

createApp(App).use(store).use(router).mount('#app')
# Vue2迁移
emit
# 参考文档
一文带你掌握Vue3新特性,再也不怕面试官啦~ (opens new window)
← gulp手写注入插件 js手写代码系列 →